
Written by Remy Kullberg, Doug Miller, and Ariel Ropek.
PantherFlow is Panther’s piped query language that delivers the expressive power you need to move through an investigation rapidly and with ease. PantherFlow was created to bridge the best of Simple Search and SQL in order to enable security analysts and engineers with one intuitive language that they actually enjoy using.
In this walkthrough, you’ll get a hands-on look at just how expressive PantherFlow is. We’ll show you how to investigate an attack on an Amazon EKS Cluster with PantherFlow starting from a CloudTrail alert.
As a fun bonus, you’ll be able to test out and write PantherFlow queries yourself in an interactive demo integrated right into this blog. Step by step, you’ll uncover activity that indicates privilege escalation, lateral movement, persistence, and secrets exfiltration.
Need more context first? Check out our blogs on why we developed our own piped query language and how to write PantherFlow queries.
The Threat Scenario
In this scenario, a CloudTrail event indicates a threat actor has gained unauthorized access to your AWS account and created a new IAM user with administrative privileges. You need to track this user’s activity to determine what they have accessed and what systems may be compromised.
As we work through this scenario, we’ll answer the following questions:
When was the potential threat actor created?
What resources or infrastructure was accessed?
Was there any data loss or system compromise?
What’s the timeline of events?
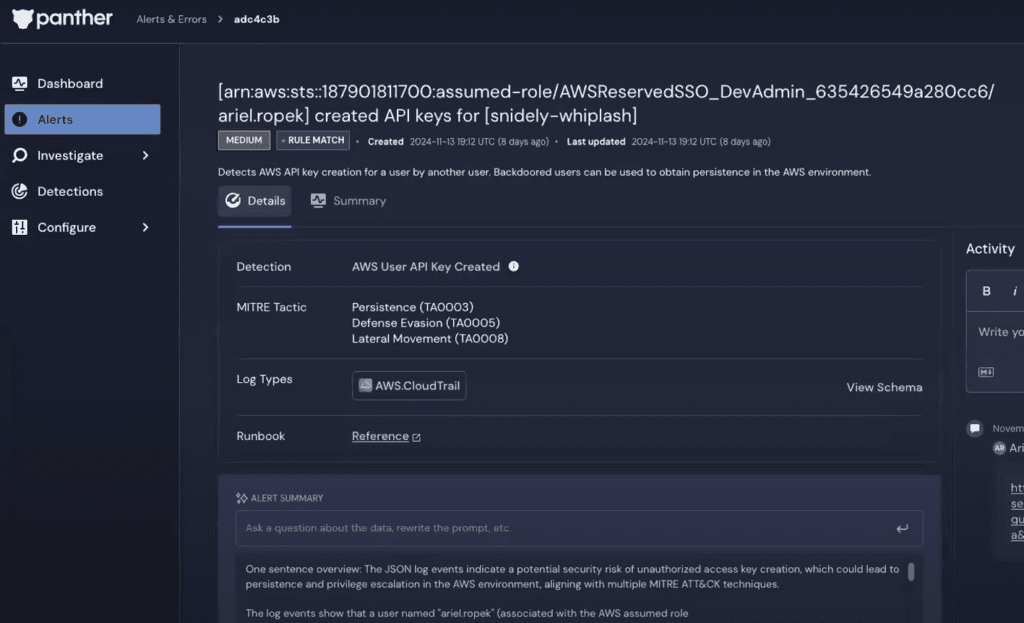
An Alert for AWS IAM API Key Creation
This investigation scenario starts with a CloudTrail alert for IAM API key creation, one of Panther’s many prebuilt detections.
Someone named “ariel.ropek” has created API keys for a new user called “snidely-whiplash.” This could indicate that an attacker may be attempting to obtain persistence, evade defense, or move laterally within your AWS environment. Let’s investigate.
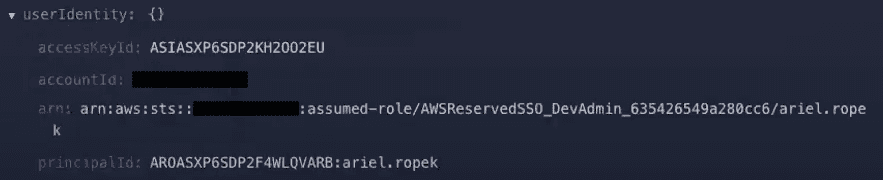
The first thing we’ll want to look at is the activity by this user around the same time period as the alert. To do this, we’ll use the amazon resource name (ARN) as an indicator in our search.
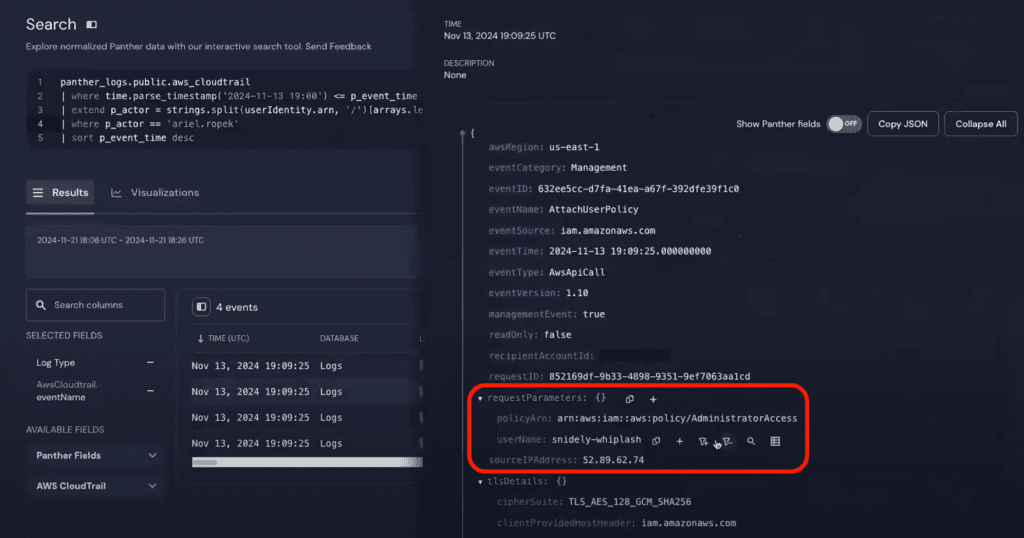
Scroll down within the alert to find the log data. Here we’ll find the ARN is located within the userIdentity.arn field.
Understanding the Activity Surrounding the Alert
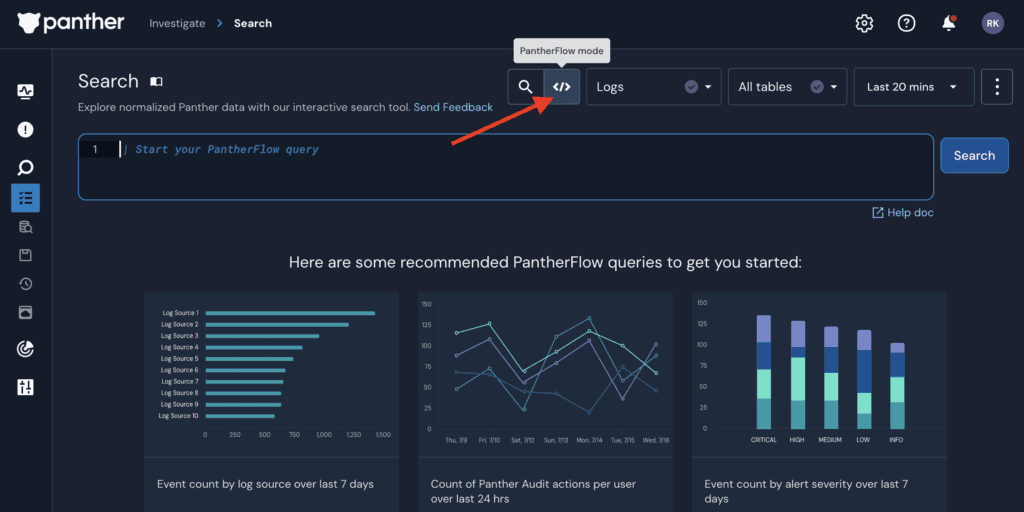
Let’s write our first PantherFlow query.
Open the Search interface and click </> to toggle to PantherFlow mode.
You’ll be greeted with recommended PantherFlow queries to get started, but we’ll jump right into writing our own.
In PantherFlow, every query starts with the table that you are querying, and then filters, joins, and transformations are added as subsequent building blocks.
We’ll start our query by listing the CloudTrail database.
Then, we’ll filter the data in the table by writing a where clause that narrows the focus to only the hour surrounding the alert.
We’ll grab the original timestamp from the alert, “2024-11-13 19:12,” and parse it with the time.parse_timestamp() function and use equality comparisons to look between the hours of 7 and 8 PM:
Next, we’ll narrow down the logs some more based on the actor’s ARN in the userIdentity.arn field.
But we’re actually only interested in searching with the indicator “ariel.ropek,” at the very end of the long ARN arn:aws:sts:redacted-id:assumed-role/AWSReservedSSO_DevAdmin_635426549a280cc6/ariel.ropek.
To format the data just how we need it, we’ll use the extend operator and the strings.split() function.
The extend operator creates a new field called p_actor to store the string “ariel.ropek.”
The strings.split() function handles grabbing “ariel.ropek” from the end of the ARN. With this function, we split the ARN on the forward slashes '/' into an array of strings.
To grab the last string in the array, we’ll use standard array index notation [ ] and put in the index number of the last element. To calculate this, we’ll use another handy function called array.len( ) to calculate the array’s length, minus 1.
Next, we’ll use the new p_actor field to filter for logs where the actor is “ariel.ropek,” and then we’ll sort by descending event time to see the most recent events first:
The search results show four events within the hour.
To see what happened, let’s click into an event and add eventName as a column to our search results. You can add any log field as a column to your search results to make analyzing the data easier.
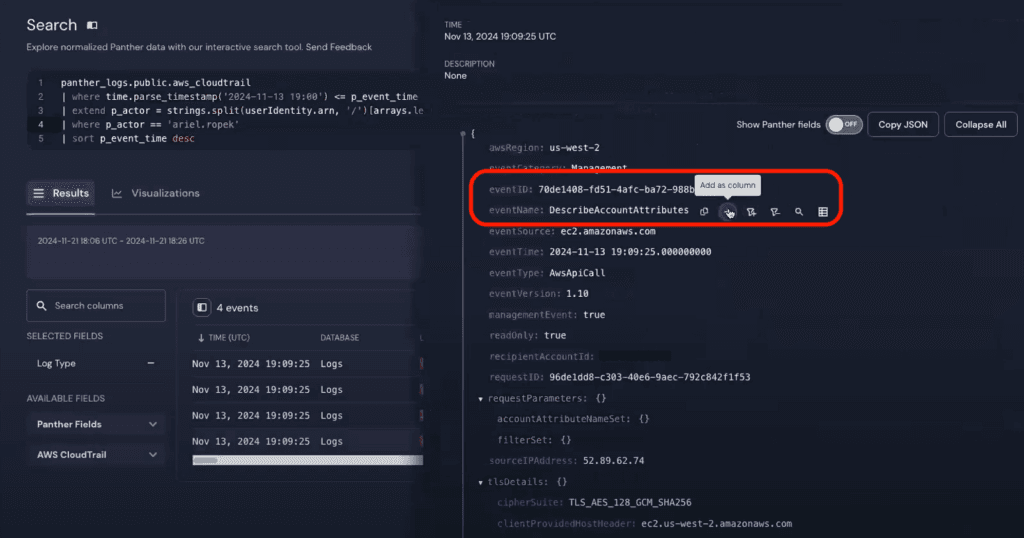
From these events, we get our first insights: Ariel created a user and access key—the cause for the original alert—and attached a policy to the new user.
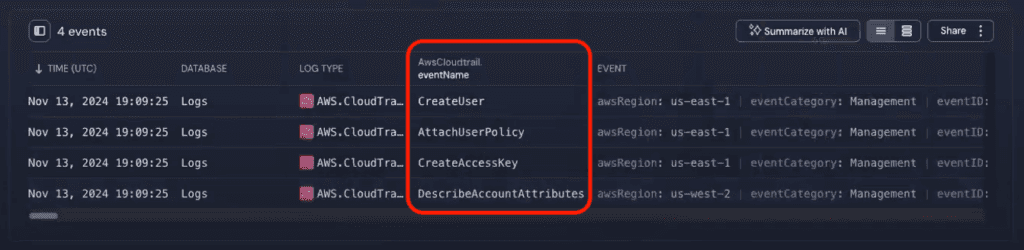
Looking into the AttachUserPolicy event, we can see that the user “snidely-whiplash” has full administrator access in the AWS account.
Tracking Lateral Movement and Privilege Escalation
What did Snidely Whiplash do with administrative access? Let’s dig into that next.
We can find out what actions the new user took with a quick update to our existing PantherFlow query. We’ll update line 4 to filter by whether the p_actor field equals 'ariel.ropek' or 'snidely.whiplash'.
To do this, we’ll use the array comparison in to search for a value in an array, like this: | where p_actor in ['ariel.ropek', 'snidely-whiplash'].
Understanding the Results
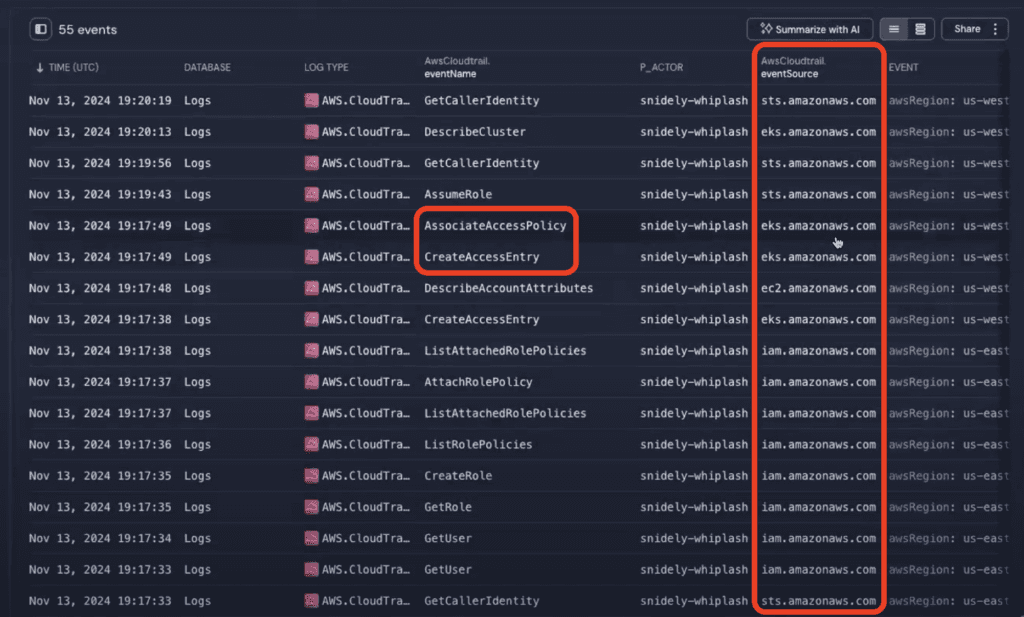
With this update, we’ll get back 55 events—a lot more data.
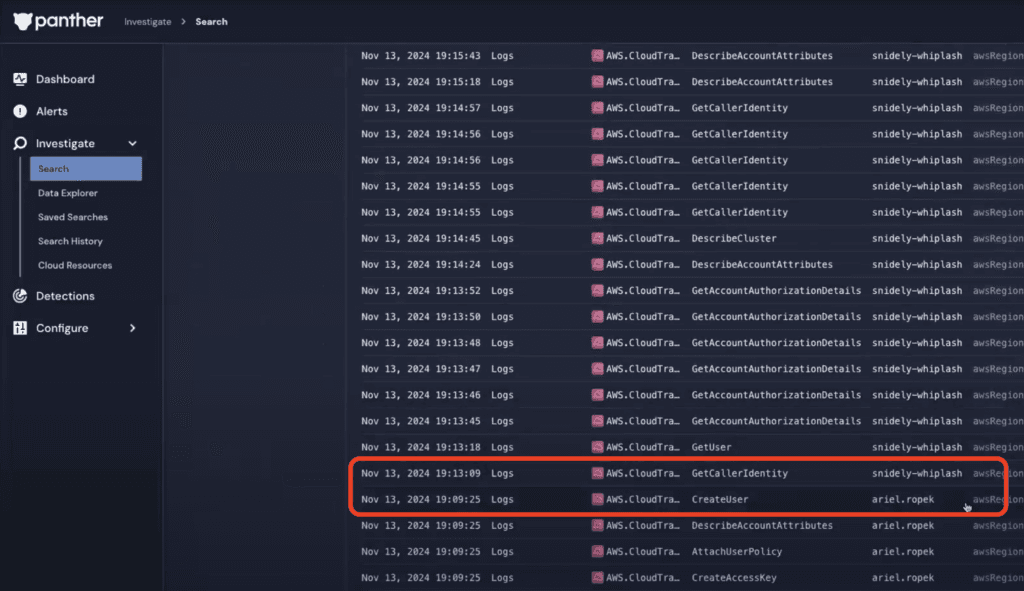
We can look at the p_actor column to see the timeline of when Ariel left off and Snidely took over. Scrolling down to the bottom of the log data, we’ll see that Snidely took over at the timestamp 2024-11-13 19:13:09.
Looking at the eventSource column, we can determine what AWS resources were messed with. We can see IAM, STS, and EKS events. The most recent events show movement into Amazon EKS.
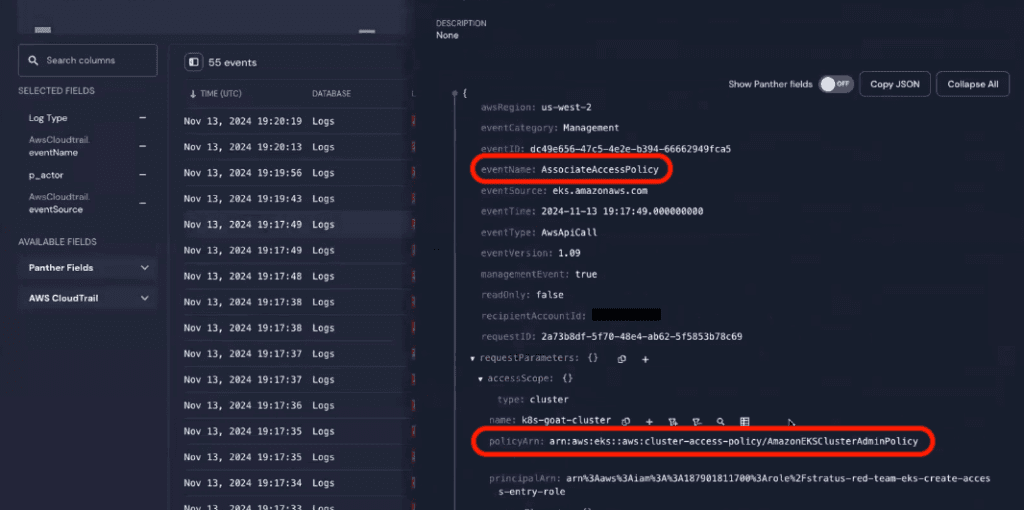
Looking at the eventName column, we can see what sort of commands Snidely has been running in EKS: Snidely created a new EKS access entry and then gave it an access policy.
The next image shows the details of the AssociateAccessPolicy event. Looking at the policyArn field confirms the new access entry is associated with the Amazon EKS cluster admin policy.
The timeline of events clearly shows lateral movement from the AWS account into EKS and privilege escalation within EKS.
Discovering EKS Secrets Exfiltration and Persistence
The next thing we need to do is analyze our EKS logs to determine what Snidely Whiplash is doing with their admin privileges. We’ll look at both EKS Audit and Authenticator logs alongside our CloudTrail logs so that we can see the whole timeline of events. That means searching across three different tables.
In SQL, querying multiple tables that have different schemas is very challenging. You can attempt to do this with JOINs, but more than likely you’ll end up creating three separate queries in three separate windows.
In PantherFlow, querying multiple tables is as simple as using the union operator and listing your tables, separating each with a comma.
Since each of these log types do have different data structures, we’ll need to create a data model to bring them together. We can do this easily using the coalesce() function.
First we use the extend operator to create a new field called p_aws_arn to store the AWS ARNs from each log type.
Then, we extract the AWS ARNs from each log type as p_aws_arn using coalesce(). To do this, we first identify the name of the field that corresponds to the user’s ARN for each of the log types. Then we pass those field names as arguments to the coalesce() function. For CloudTrail this is userIdentity.arn, for EKS Audit it is user.username, and for EKS Authenticator it’s simply arn.
Under the hood, the coalesce() function starts by searching for the first argument in the logs, and if it doesn’t find it, it moves onto the next, and so on, allowing you to search for different values across multiple log types with one handy function.
Since we still want to have the p_actor field extract the actor username from the last part of the ARN, we’ll update userIndentity.arn in line 4 to p_aws_arn. Now the p_actor field will parse the usernames from each log type’s ARN.
We’ll also want to begin to summarize the actions taken across these log types.
We can do this once again using the extend operator and the coalesce() function.
The extend operator creates a new field called p_action to store the actions taken by the actor and the coalesce() function extracts the activity from each log type. For CloudTrail this is eventName and for EKS Authenticator it’s path. For EKS Audit this is verb and resource, which we combine into one field with the strings.cat() function.
The last indicator that we’ll want to add to our query is the role that Snidely Whiplash assumes after creating the EKS entry and assigning an EKS cluster admin policy to it. If we look back into the AssumeRole CloudTrail event, we can see that Snidley Whiplash is working within EKS using the roleSessionName of “snidely-whiplash-session.”

So let’s add 'snidely-whiplash-session' to our array of usernames to search for on line 6.
Understanding the Results
The search now returns 77 events.
We can clearly see what the actor was up to across our log sources thanks to our p_actor and p_action fields, and expanding our usernames to include 'snidely-whiplash-session'.
Reviewing the p_action column, an event that quickly jumps out from the list is the list secrets action—twelfth in the search results. Yikes! This indicates EKS secrets were accessed and dumped.
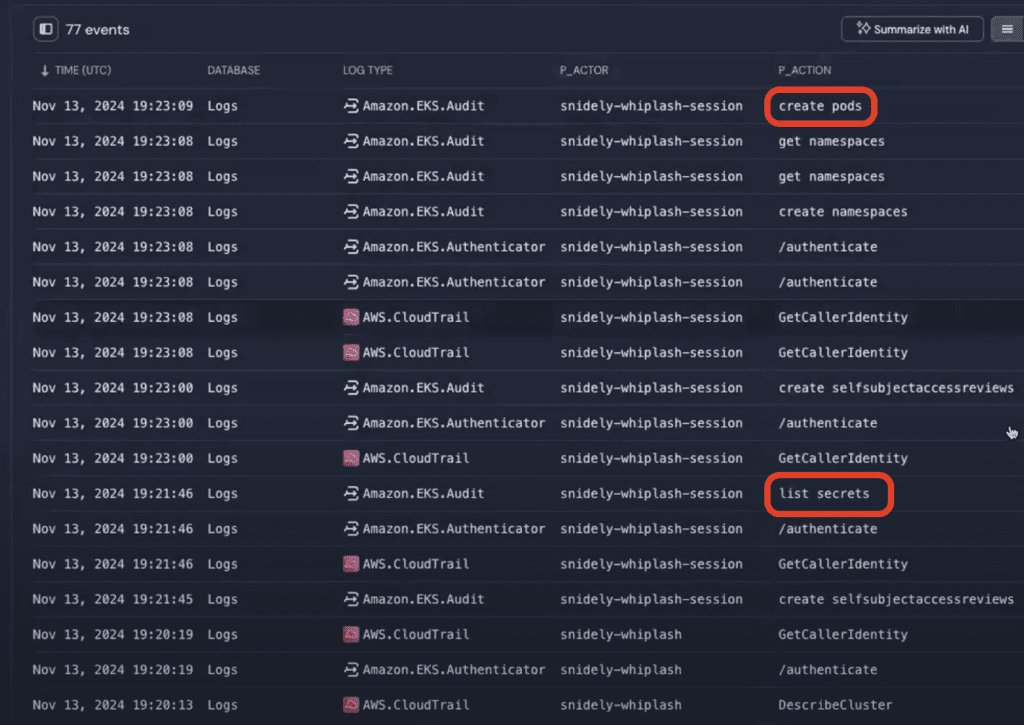
We can also see that new pods were created in the create pods action—the first event in the search results.
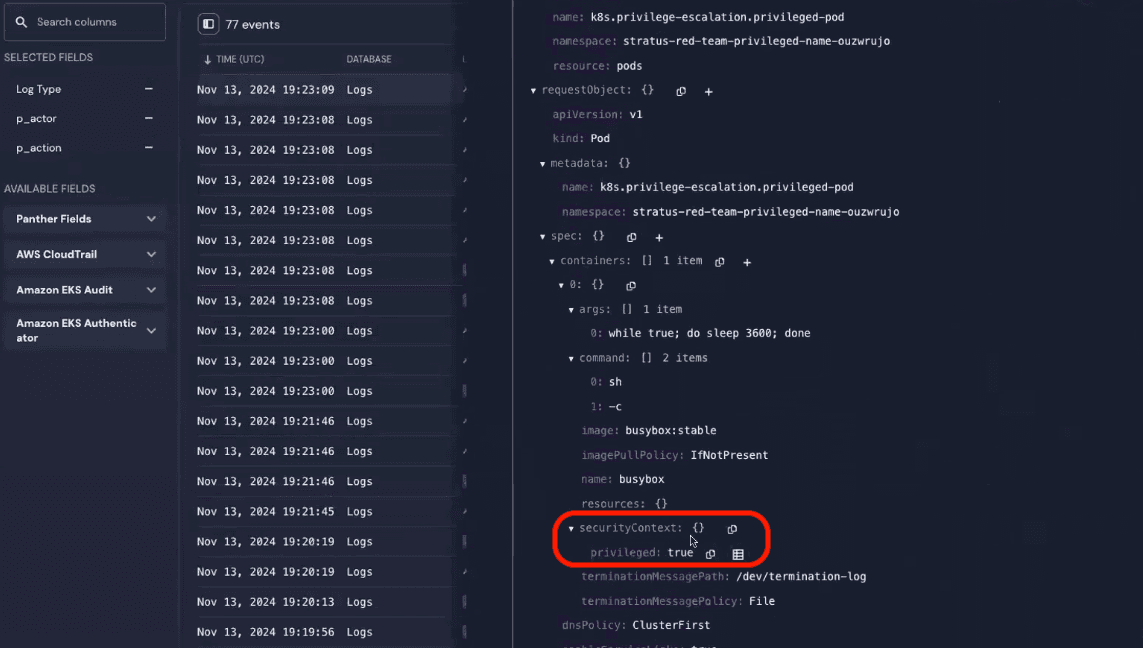
Drilling into the create pods event, the log indicates the pod was launched as a privileged pod with root access—an attempt at persistence and another instance of privilege escalation.
This is enough evidence to escalate the investigation to the incident response team.
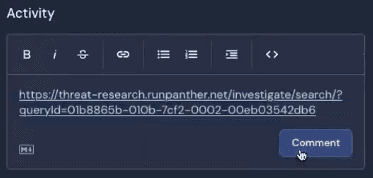
Documenting and sharing your investigation is as simple as copy and pasting this search URL into the Panther alert activity log. Your team members can then open it up and see the same PantherFlow query you put together and use it as a jump off point for further investigation.
Summarizing and Visualizing the Attack Chain
So what happened in this investigation? We were able to identify the timeline of events by filtering and transforming our data and reviewing it in a table, but you have better options.
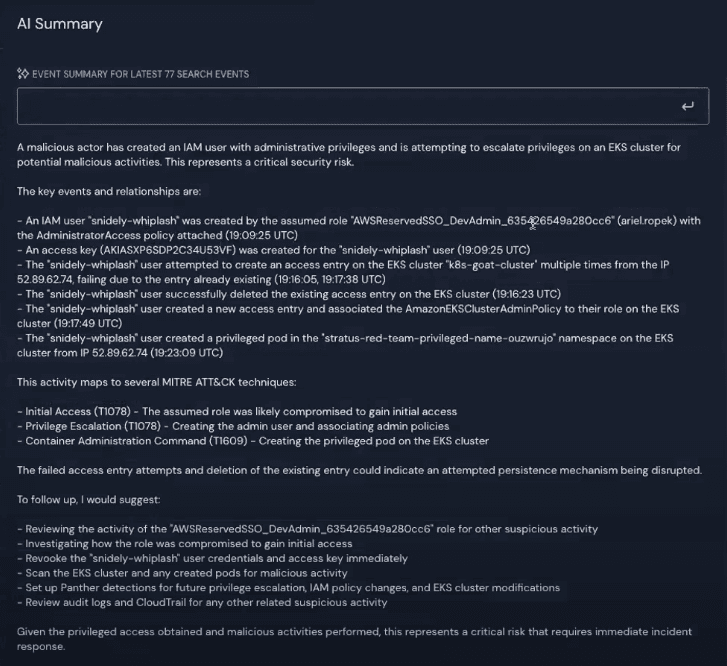
A great starting point is using the Summarize with AI feature to understand your investigation and share the highlights with a colleague.

The AI summary lists the series of events that took place along with the key indicators and time stamps, how the activity maps to MITRE ATT&CK techniques, and suggests further investigation and remediation steps.
Here’s the AI summary from this investigation:
Better yet, you can visualize your results to understand timelines, trends, and outliers at a glance. Visualizations are created using the PantherFlow visualize operator.
Let’s turn our timeline into a bar chart by making a few adjustments to our existing query.
First, comment out the sort operator on line 7.
Then, add a new line that aggregates data by the p_actor and p_action fields using the summarize operator and the agg.count() function.
Then, we invoke the visualize operator followed by a few options that specify a bar chart and that the x-axis should be the p_action field.
Finally, we’ll sort the results by the p_actor field.
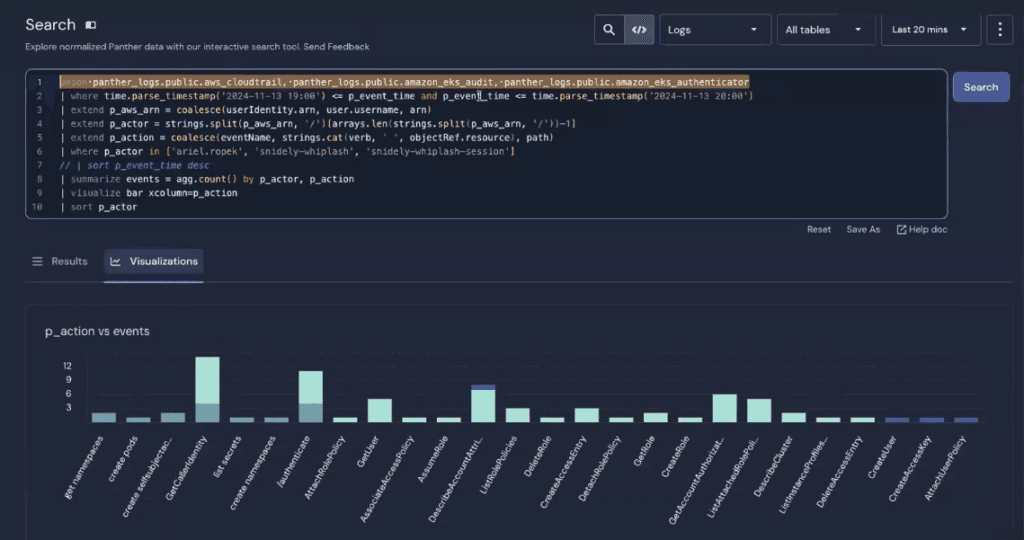
In this visualization, the actions are listed on the x-axis, and each color represents a different user account who took the action. The y-axis represents how many times each action occurred.
Our timeline starts on the right in dark blue, when Ariel Ropek created the user and access key, and attached the admin policy.
Then moving towards the center in teal, we can see where Snidely Whiplash took over and what they did. The dark green on the left shows where the snidely-whiplash-session took over. We can see listing secrets, reconnaissance, and creating the privileged pods.
Visualizations are highly customizable. With a quick update to our PantherFlow query, we could add a chart legend, orient our the chart horizontally, and add a title:
Conclusion
At Panther we believe that better security outcomes come from leveraging software engineering principles to support rapid and reliable threat detection creation and incident response.
With PantherFlow, we’ve brought our drive for rapid and reliable iteration directly into the search experience to support engineers and analysts alike with an intuitive and powerful pipelined query language.
Panther is the leading cloud-native SIEM built for security operations at scale. Request a demo to see how Panther can address your specific security needs.